
AWS Auto Scale for Magento and WordPress using S3 Titanium Series
This article will outline the basic setup process for configuring our S3 Titanium stack for use with AWS auto scale groups. The outline will be applicable for both Magento and WordPress; however, the examples used will be with an aMiSTACX G5F S3 Titanium for Magento 2.4.
Note: Before you proceed, we consider making use of AWS Auto Scale means you are an expert when it comes to both Magento and AWS infrastructure. This is because, AWS auto scale is not just horizontal and 3-tier application farm deployment, but also concepts of Continual Integration, High Availability Infrastructure, Monitoring, and of most of all, Costs related to duplicating your farm tier to N nodes. We will NOT be in the position of providing assistance beyond what is posted in this article.
Tip: Should you require expert assistance, you may want to consider hiring us for your project deployment.
S3 Titanium Deployment Considerations
We will assume for the point of this article the following: You already have S3 Titanium deployed, you have a development environment, you have GIT that can push to a repo and deploy to a stage or production server. [More on this later.] You should play around with sample data if you want, and probably a good way to get your feet wet before playing with a production system. [In the future, we will probably offer a complete sample stack with AWS Auto Scale and Magento sample data for testing.]
Note: You should first ask yourself why you need to AWS Auto Scale? If you are an established business with X amount of orders per minute or per day, then it probably will cost you X per amount of time you experience an outage. This means you can justify the costs for AWS Auto Scaling. If you are just starting out with your e-commerce site, you really don’t need to go with an auto scale environment. Less is more in that situation.
3-Tier Stateless Architecture
Before you can set up a LoadBalancer and target groups, you need to make sure your stack is ready. This means it has to be a stateless design. To accommodate a stateless design, when an S3 Titanium stack is deployed, it makes use of AWS RDS. This is the backend of the T3. The middle-tier, the farm tier or web tier, needs to make use of the aMiSTACX S3R-Alpha module for media.
The S3R-Alpha module will allow publication of all media [and where available static files like CSS and js] to AWS S3 storage. This is very much required for maintenance of your site and to prevent Server 1 from getting out of sync with Server 2 and so on in the farm. With media presented to S3, you can make an update on Server 1 and it will automatically apply to Server 2. This is possible because all servers in the farm are sharing the same database RDS instance, and since S3 is also a shared flat location, all servers in the farm will automatically get this information from the database.
Note: Since caching is used by Magento or WordPress, you may/will have to flush the cache on each node in the farm to see the updates.
Once Server 1 is set up properly in a 3-tier footprint, we can begin construction and deployment of our Auto Scale infrastructure.
The AWS Load Balancer
Step 1. AWS Certificate Request
Before you can create your Classic Load Balancer, you will need to have an TLS Certificate ready to terminate at the LB.
There are more than a few ways to do this, but for this article we will go the simplest method of using the AWS Certificate Manager to issue a certificate on our amistacxdemos.io test domain.
If you are using Cloudflare, the CNAME validation is very easy to enter, and takes a few minutes to become active. We recommend Cloudflare for ALL customers and to make use of CF for CDN and DNS. Plus some of the API is integrated with A51.
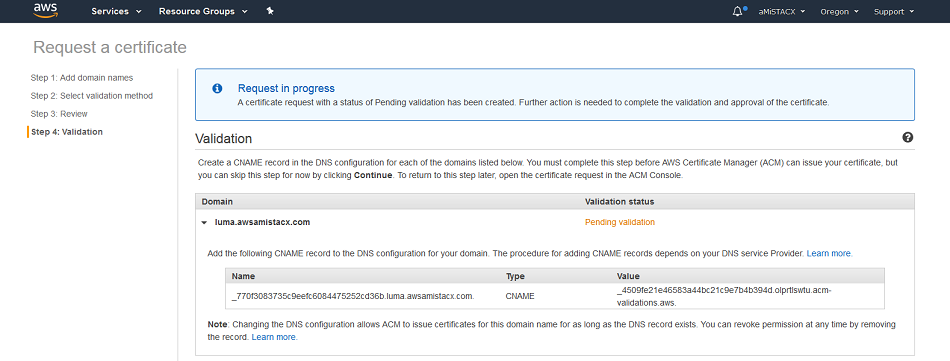
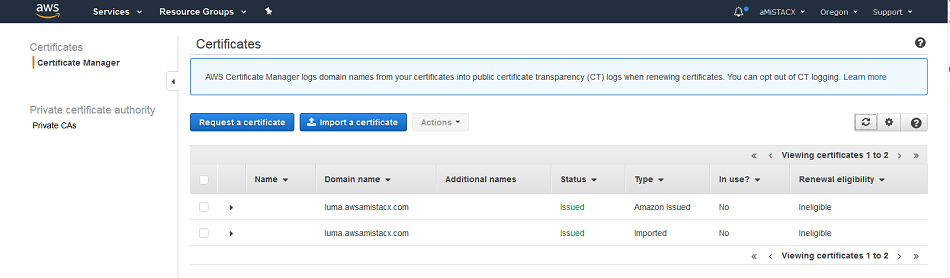
Once you have validated your certificate with AWS, you need to assign it to the Load Balancer upon creation.
Step 2. Create a Classic Load Balancer [CLB]
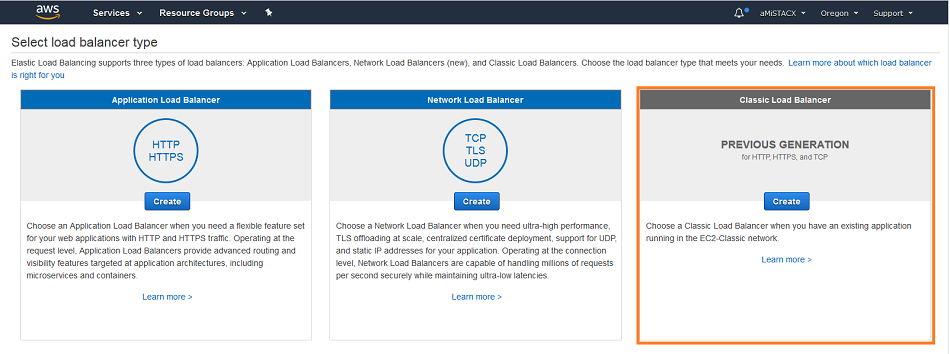
Define a name that makes logical sense, and adding inbound ports. Really you only need 443 inbound, as port 80 is obsolete. When using Cloudflare as your CDN, you can make use of HTTPS only. This makes sure all traffic goes to 443 by default and operates at the edge DNS level. This has a slight speed increase effect. For this article we will show a traditional 80 and 443 CLB.
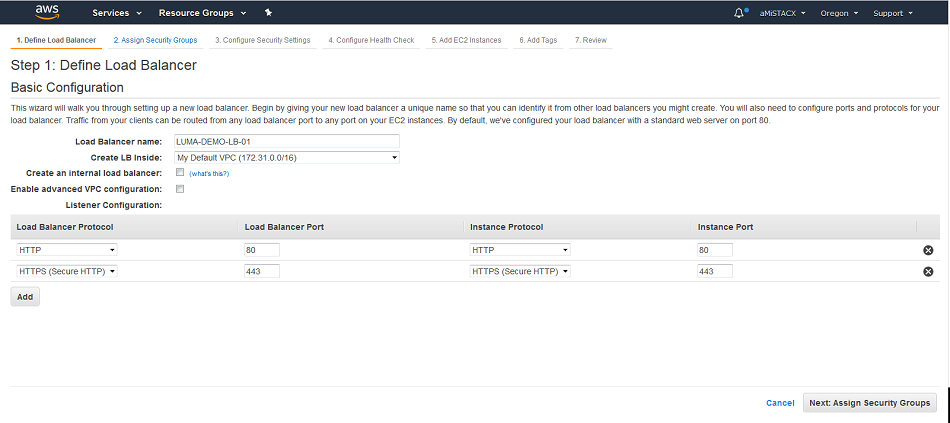
B. Create or assign a security group to assign to the CLB. This is an extension of step A.

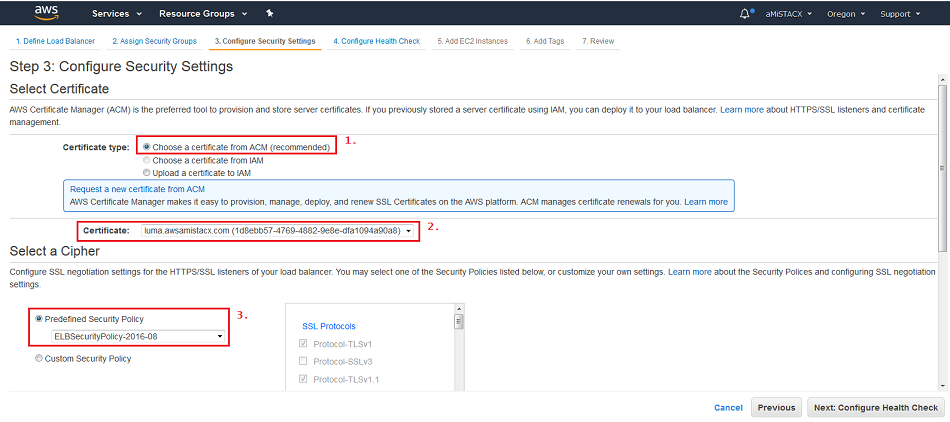
C. Here we will assign our certificate that we created in step 1. Additionally, we just went with the defaults.
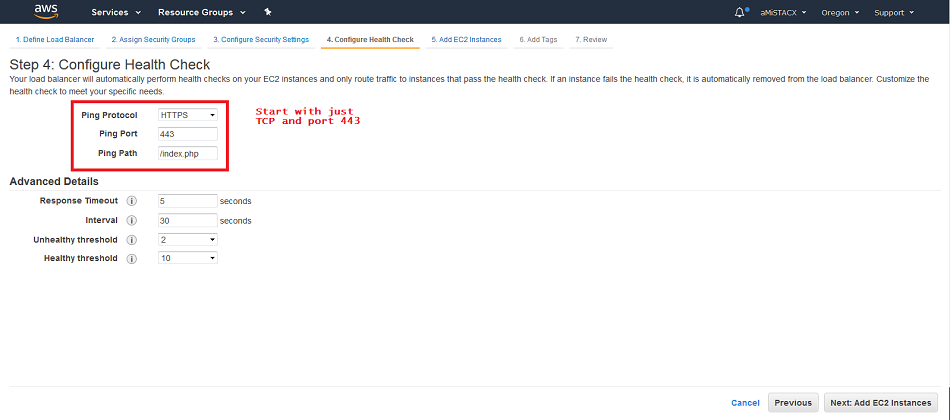
D. To get up and running quickly and reduce issues with getting the CLB to come online, we will temporally create a very open Health Check of a TCP request to port 443. [Not shown in image!]
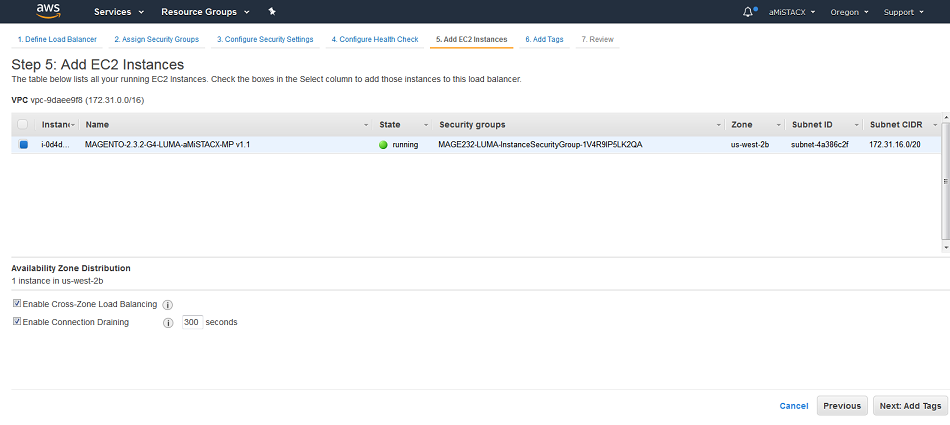
E. We will add our target instance at this step. You will see we selected our luma demo server.
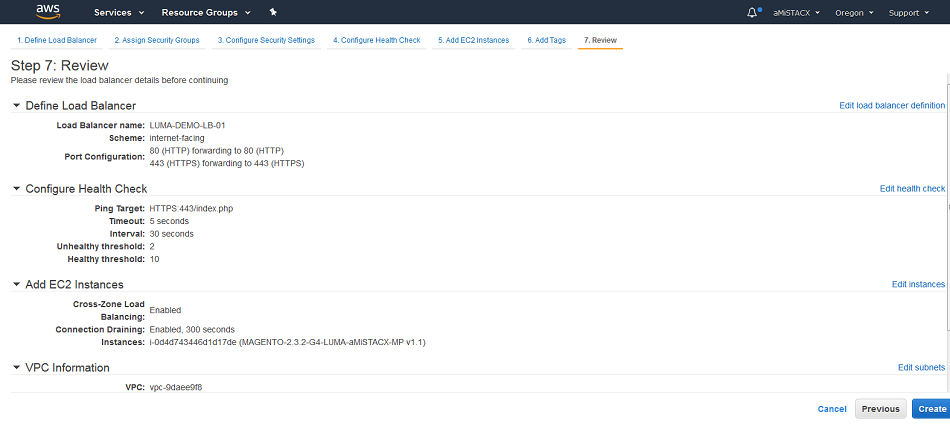
F. Review it all and make last minute edits if required.[Note: The Health Check shown in this image will fail.]
AWS Auto Scale Launch Creation
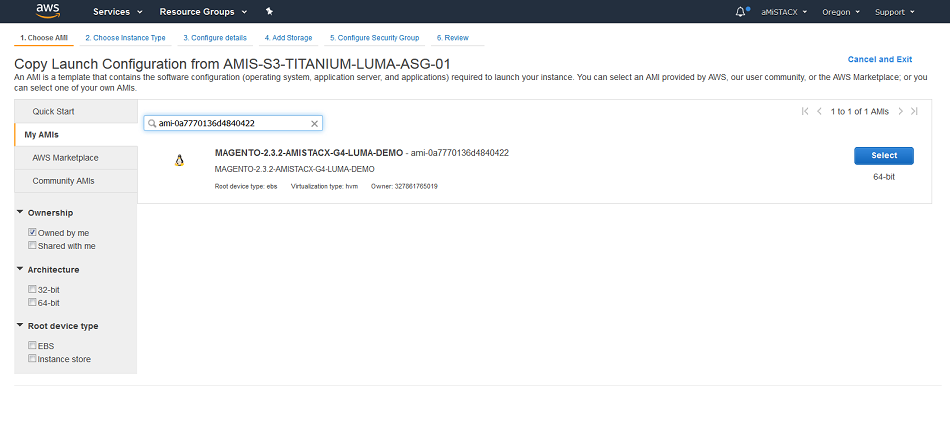
Step 1. First you must create a FULL AMI Image of the server you wish to deploy in an Auto Scale Group [ASG]. Remember that the EC2 for Magento, WordPress, Laravel, etc. must be in a stateless configuration. You can use A51 or the AWS console to create the master image.
Step 2. Creation of an Auto Scale Launch Configuration. You will first select your AMI from the My AMIs and you can filter by AMI ID. You will then select typical instance on launch details such as instance size and volume size.
Tip: Make use of AWS reserved instances to reduce costs up to 75%!
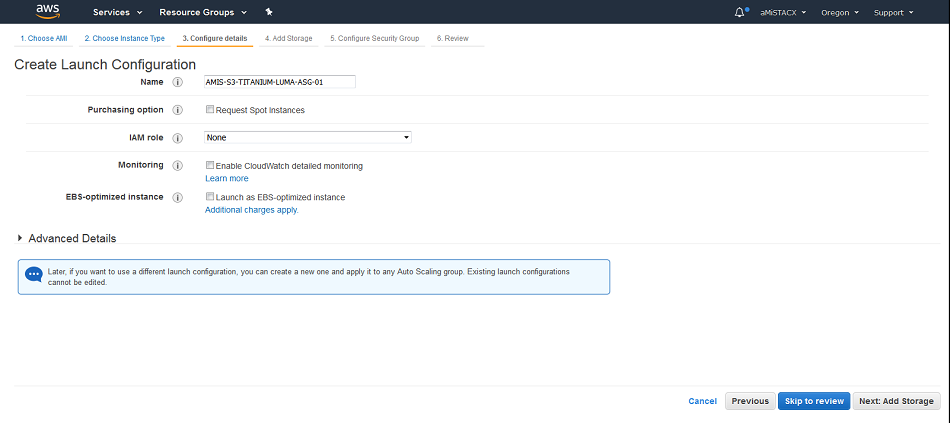
Step 3. Name your Launch Configuration and add any advanced options.
Step 4 and 5. Select launch storage size. Select of create a security group. Keep in mind this is different from the Load Balancer or RDS security group. This security group is at the web tier, and operates like your normal EC2 single SG. Here you need to make sure port 22 is available so you don’t lock yourself out of an instance. You will also need to take into consideration outbound ports for email, RDS, and Elasticsearch [Optional].
Step 6 and 7. Review. The key you create or use will be the SSH key pair to connect to any instance in the farm.
AWS Auto Scale Group Creation
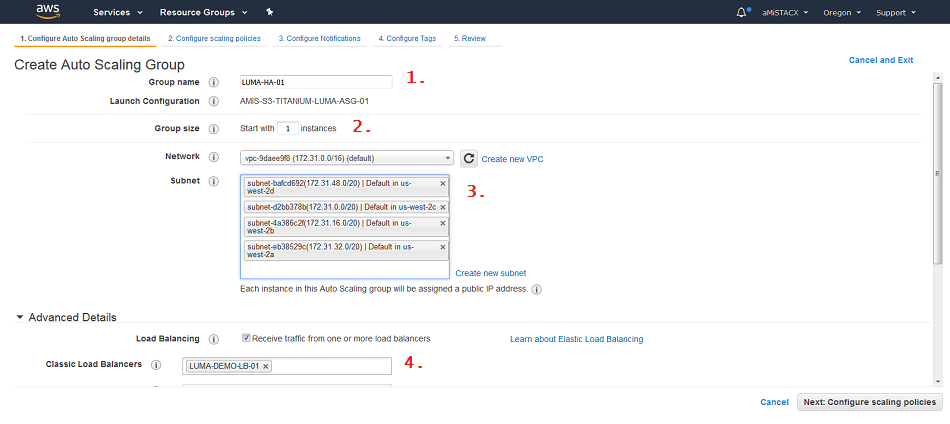
Step 1. 1) Create a logical name. 2) The group size to start with. 3) Everything in one subnet or span subnets? 4) Here is where you attach to the Classic Load Balancer.
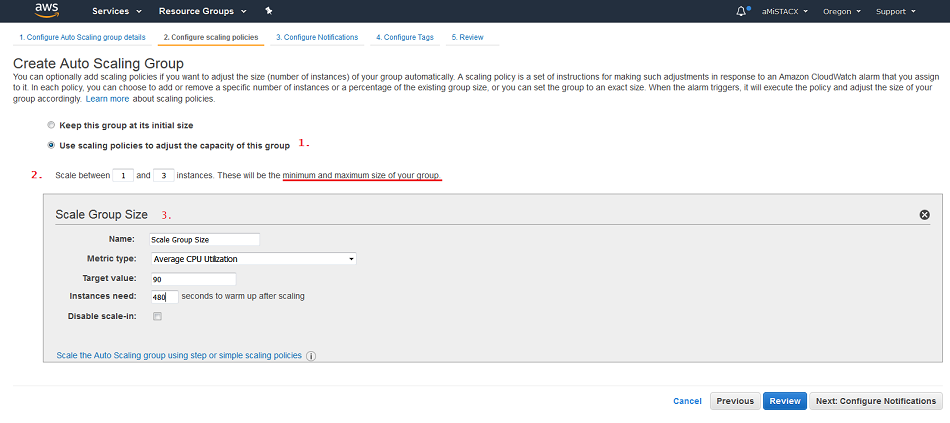
Step 2. This is where all the fun begins. Here you are creating a policy to determine when to spin up a new server. 1) Have the policy control the scale-in thresholds. 2) Set minimum and maximum to your total group size. 3) What is your threshold? Here I used CPU, and set it at 90%. This means a two proc server would need to reach 90% utilization of the CPUs before a new server is launched, and then I set a scale-in period of about 8 minutes to allow the new server to settle in.
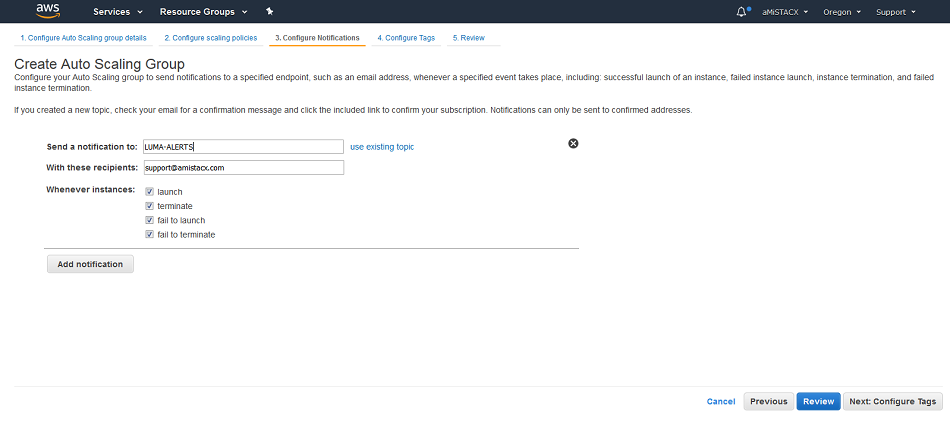
Step 3. Notifications can be sent to your email address. If you make use of A51, you can set heath checks and alerts to be sent to an SMS device.
Tip. Name your Alert with a “-” or “_”; otherwise, you will throw an error upon Auto Scale Creation.
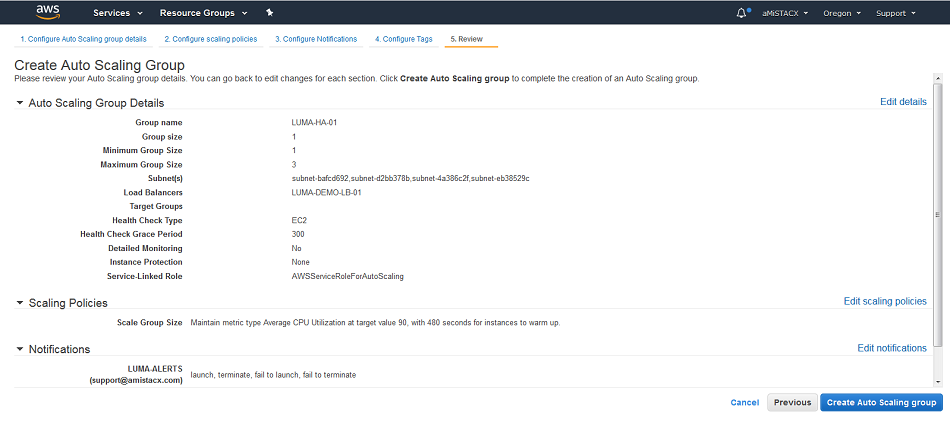
Step 4 and 5. Configure audit/reporting tags. Review. Once you click create it will flag any errors.
LAUNCH AUTO SCALE
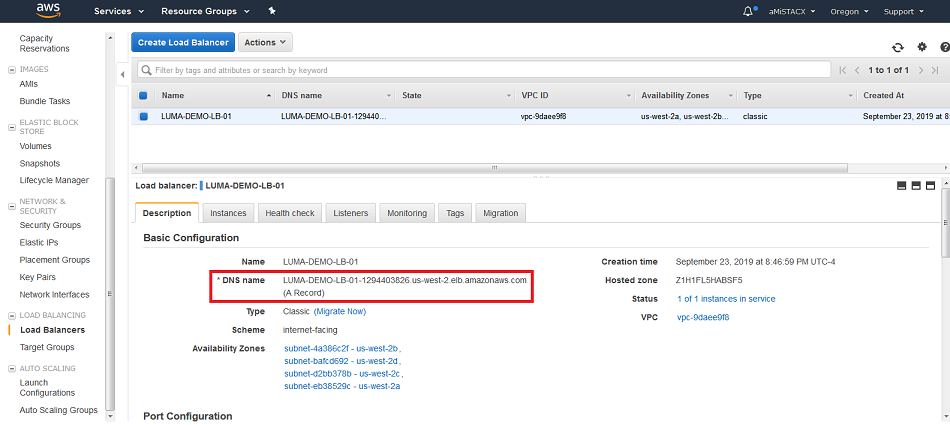
The final step is to configure DNS; otherwise, the public DNS will have no idea how to resolve to the Load Balancer. You can get the public DNS information from the CLB information panel. We will use this information on Cloudflare to create a CNAME for our luma demo server.
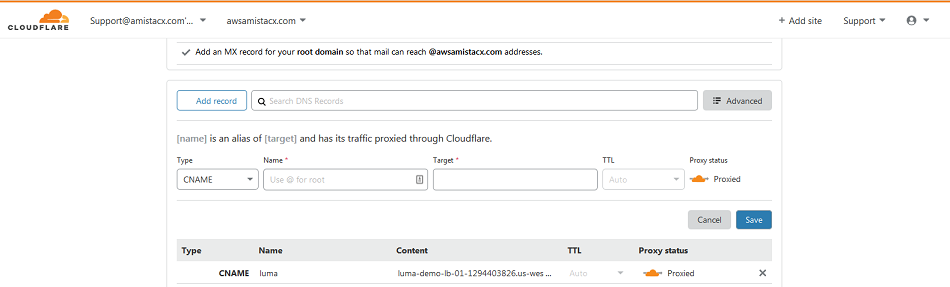
Cloudflare DNS
As you can see here we created the CNAME for the LUMA domain to point to the AWS Classic Load Balancer FQDN.
TESTING AND TIPS
- To test the basics of your configuration, my suggestion is to set the Auto Scale Policy lower, maybe 75%, then use a load generation script [A51 has a load testing tool]. You can then dial-in your policy by increasing or decreasing your thresholds based on your comfort levels.
- Tighten ALL of your security groups AFTER you have everything working. You have three security groups: Load Balancer, EC2, and RDS. Only have ports open inbound and outbound that you need.
- Use Cloudflare to have HTTPS set to default, and then you have no need for port 80. This not only a more secure footprint, but also a faster one.
- Use A51 to set heath checks and alerts to your team. Here you can define SMS devices like a text message to you or your team’s mobile phones.
- Use GIT to push code to your repo from your AWS Development Server, then manually pull to a stage instance. You can manually add instances at the Load Balancer as targets. The discussion here is beyond the scope of this article, and you can find a few advanced topics on best practices and how-to-dos with Continuous Integration and how to use with a Auto Scale group.
Final Comments
As this topic is very advanced, and open to many different types of configurations, please reach out to us if you have any hang-ups, wish-list items for A51, or general feedback on your success. We have helped a few clients in our consultancy program to deploy with AWS Auto Scale and aMiSTACX, and the results have been rewarding.
Weaponize your Business with aMiSTACX!
~ Lead_Robot