Most of our EC2 Linux stack deployments start off with root volumes between 8 – 30GB.
Obviously as your business grows, at some point you’ll just need more space. Luckily, Amazon AWS makes this a very easy process. Although, it is extremely easy to go up in size, it is also very difficult to go down in size. So we’ll outline some tips here to keep you going in the right direction.
Step 1. – Be smart and make a FULL backup image of your EC2 server before you begin. We suggest you keep the backup as you may need this base image for a smaller footprint.
Step 2. You can start the process of increasing the volume size while your EC2 is running, or in a stopped state; however, the new increase in drive space may not be available until the instance is stopped and restarted after the progress indicated 100% complete.
Within the EC2 main AWS console, navigate the left-hand menu to the volumes section. Then from the list of active volumes, select the volume you want to modify. Should you have a lot of volumes, you can identify the instance the volume is attached to by the EC2 ID.
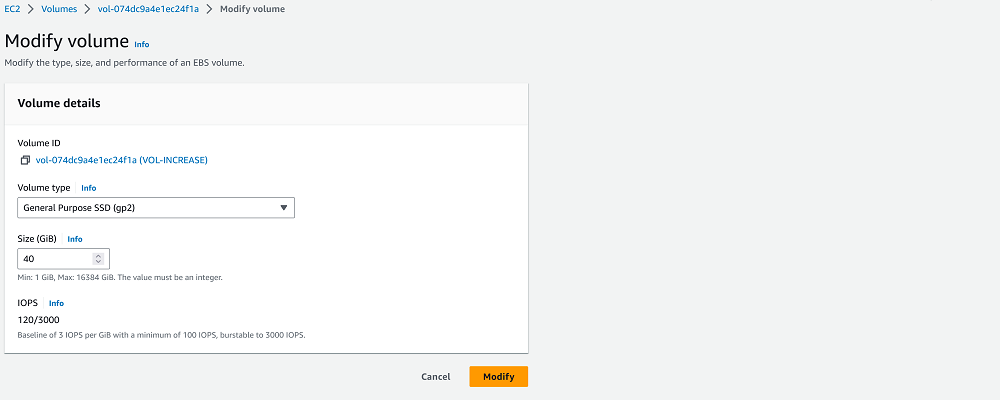
Step 3. After selecting the volume to modify, click the “Actions” menu, and then select “Modify”.
Step 4. Select the size you want to increase to. Remember only increase to what you really need, or a calculated future point as this action may increase your costs.
Step 5. You just only have to wait for the modification process to complete. The AWS console will provide a status report in %percent% complete.
Step 6. You can quickly verify your new pumped up volume, by SSH to CLI and running:
Use the lsblk command to display information about the block devices attached to your instance. If a resized volume has a partition and the partition does not reflect the new size of the volume, use the growpart command to extend the partition.
You’ll get an output like this. You just need to identify the root volume. [You can also use the df command.]
~$ lsblk
NAME MAJ:MIN RM SIZE RO TYPE MOUNTPOINT
nvme1n1 259:0 0 30G 0 disk /data
nvme0n1 259:1 0 16G 0 disk
└─nvme0n1p1 259:2 0 8G 0 part /
└─nvme0n1p128 259:3 0 1M 0 part
Step 7. If after the process is complete, and you stopped and restarted the instance, and it still shows the increase as NOT recognized, then you need to take one extra step. From command line run: [Assuming Defaults]
For a T2: sudo growpart /dev/xvdf 1
For a T3 [Nitro]: sudo growpart /dev/nvme0n1 1
Then run lsblk or df from CLI again to verify.
In rare circumstances, you may have to issue a reboot.
sudo reboot
Ref: AWS EC2 Extending a Linux File System after Resizing the Volume
Weaponize your Business with aMiSTACX!